39 how to mail merge onto labels
mail merge labels on multiple pages - Microsoft Community you need to select the destination for the execution of the merge by expanding the finish & merge dropdown in the finish section of the mailings tab of the ribbon - either "edit individual documents" which will create a new document containing as many pages of labels as dictated by the number of records in the data source, or "printer" which … › Print-Labels-on-Google-SheetsHow to Print Labels on Google Sheets (with Pictures) - wikiHow Apr 09, 2021 · These are the names of the type of data in each column. Avery Label Merge requires a header at the top of each column. For example, if you want your labels to contain a United States resident’s name, address, city, state, and zip code, you may call A1 NAME, B1 STREET, C1 city, D1 state, and E1 zip.
Mail Merge Guide - Online Labels® How to Set Up Your Mail Merge Launch Maestro Label Designer and sign in. Open a new or saved template. Hover over "Tools" in the blue navigation bar and select "Mail Merge," then hit "Start Mail Merge." You will be prompted to add a new datalist or use an existing list. Note: If you don't have a document created yet, learn how to make one .
How to mail merge onto labels
How to Mail Merge Address Labels Using Excel and Word Open Word and go to "Tools/Letters" and "Mailings/Mail Merge". If the Task Pane is not open on the right side of the screen, go to View/Task Pane and click on it. The Task Pane should appear. 4 Fill the Labels radio button In the Task Pane. 5 Click on Label Options and choose the label you are using from the list. Click OK once you have chosen. 6 How To Do a Mail Merge to Print Your Envelopes - Hudson & Sound If you do this, you may have to go back to Step 2 and re-open the "data source" with your saved file. 4. Style the Text Highlight all of the placeholder text and choose the appropriate font, color, spacing, size and style you want. 5. Print On Step 6 of the mail merge tool, choose "Custom" and print only the first few by entering "From 1 to 5". Creating a Mail Merge to Labels in Microsoft Outlook When the MailMerge helper dialog opens, press the Setup button. This opens the Label option dialog, where you choose your label style. Click OK after selecting your label style to return to the MailMerge helper dialog. Click Close and Word loads the template for your selected label type. Enter the merge fields you need for your labels, using ...
How to mail merge onto labels. Mail merge using an Excel spreadsheet - support.microsoft.com Choose Edit Recipient List. In Mail Merge Recipients, clear the check box next to the name of any person who you don't want to receive your mailing. Note: You also can sort or filter the list to make it easier to find names and addresses. For more info, see Sort the data for a mail merge or Filter the data for a mail merge. Insert a merge field How to mail merge and print labels from Excel - Ablebits When arranging the labels layout, place the cursor where you want to add a merge field. On the Mail Merge pane, click the More items… link. (Or click the Insert Merge Field button on the Mailings tab, in the Write & Insert Fields group). In the Insert Merge Field dialog, select the desired field and click Insert. Video: Use mail merge to create multiple labels Use mail merge Create and print labels Video Use mail merge Video Format and add a graphic Video More options and custom labels Video Next: Creating an MLA paper with citations and a bibliography Overview Transcript If you wanted to create and print a bunch of recipient address labels, you could type them all manually in an empty label document. PDF How to Mail Merge Labels Starting the Mail Merge: In the template you just created, begin by selecting Mailings from the top toolbar, then: 1. Select Start Mail Merge and then Letters 2. Choose Select Recipients, then Use Existing List. Navigate to, and open the Excel spreadsheet you created earlier 3. Highlight the line of text that says Company, then select Insert Merge
› pc › word-labelsHow to Create, Customize, & Print Labels in Microsoft Word II. Create Labels with Different Addresses (Mail Merge) A. Set-up and Import Addresses from Microsoft Outlook. Open Microsoft Word and click Mailings on the menu line. Click Start Mail Merge from the ribbon, and click Labels. Click on the drop-down box arrow next to Label vendors, and click on the name of your label vendor. How to mail merge and print labels in Microsoft Word Step one and two In Microsoft Word, on the Office Ribbon, click Mailings, Start Mail Merge, and then labels. In the Label Options window, select the type of paper you want to use. If you plan on printing one page of labels at a time, keep the tray on Manual Feed; otherwise, select Default. support.microsoft.com › en-us › officePrint different labels on one sheet in Publisher Your best bet for printing different labels onto one sheet in Publisher is to start with the right labels template and use mail merge to create the labels. Avery stock or other perforated blank label sheets will work with many of the templates you can find in Publisher or online. Print labels or envelopes using mail merge with an Excel spreadsheet Print labels. Creating labels with mail merge is a four-step process: set up a document to match your labels, connect to your spreadsheet, format the merge fields, and then print your labels. Step 1: Set up a document to match your labels. On the Mailings tab, click Start Mail Merge > Labels. In the Label Options dialog box, next to Label ...
How to Create Mail-Merged Labels in Word 2013 - dummies The merge fields are placed into the upper-left corner cell of the table and copied into the other cells. In Word, press Ctrl+N to start a new blank document and then choose Mailings→Start Mail Merge→Labels. The Label Options dialog box appears. Video: Create labels with a mail merge in Word Once your mailing addresses are set up in an Excel spreadsheet (see the previous video to learn how), it's a snap to get Word to create mailing labels from them. Create your address labels In Word, click Mailings > Start Mail Merge > Step-by-Step Mail Merge Wizard to start the mail merge wizard. How to create mailing labels by using mail merge in Word? Step 7. Put the cursor at the start of the document and click Mailing > Insert Merge Field, then select the information you want to be included in the labels. See screenshot: Step 8. Repeat step 7 to insert all the information you need, see screenshot: Step 9. Click Update Labels in the Write & Insert Fields group under Mailings tab. How to use the Mail Merge Manager to create mailing labels or envelopes ... To use the Mail Merge Manager to create mailing labels, follow these steps: On the View menu, click Print Layout. On the Standard toolbar, click New. A new, blank Word document opens. This becomes your main document. On the Tools menu, click Mail Merge Manager.
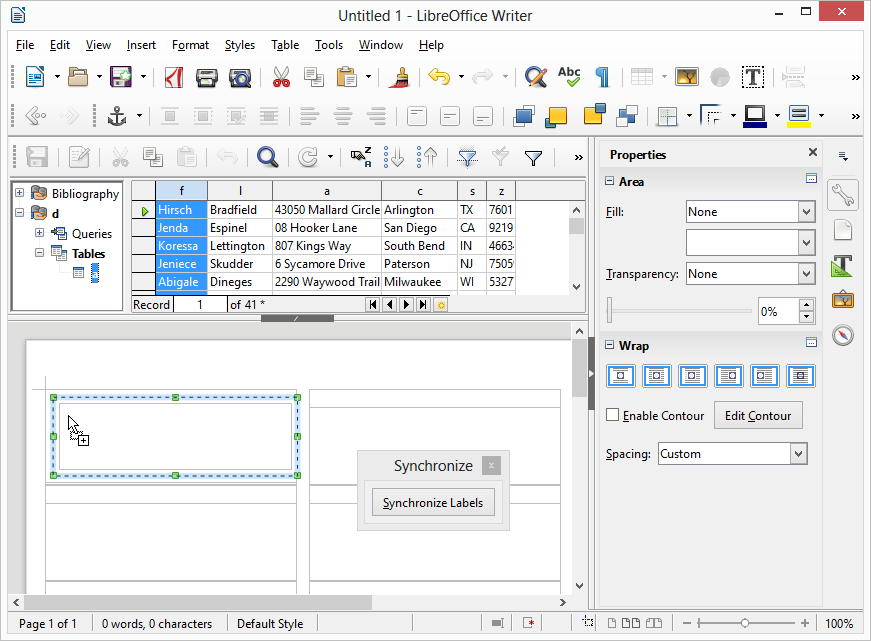
Print Address Labels From a LibreOffice Spreadsheet (Mail Merge) • Chris Cammack
How to Mail Merge Labels in Word 365 - Easykey Before you print onto your actual labels sheets it's a good idea to test is all lines up. So just print one page on ordinary A5 paper by clicking File > Print as usual. Then hold up your result over a label sheet to ensure it lines up. 6. Print the Labels. If you are happy with the test here's how to print off all your labels...
Post a Comment for "39 how to mail merge onto labels"